Network Configuration Changes to Enable IPv6
Applies To: CLOUD VPS DEDICATED
In order to start using IPv6 there are a few small configuration changes that are required on the server. The method is slightly different for Redhat based distributions and Debian based distributions so both are described below.
Cloud VPSs
Applies To: CLOUD VPS
These configuration changes are not normally needed for Cloud VPSs. Our Cloud VPSs (both Windows and Linux), only need an Initial Reboot to automatically get the new networking configuration and apply it after enabling IPv6 on it. However, this reboot must be initiated via the Memset Control Panel for the Server (and not just from the OS). If the new networking configuration is not able to be applied automatically, then you will need to apply this manually.
Dedicated Servers
Applies To: DEDICATED
There are some additional steps that need to be taken for Dedicated Servers to fully enabled IPv6 based Networking. The steps required vary by your Operating System type, details for each of the main Operating Systems are below.
Editing the Networking Configuration for your server has the potential to disrupt networking access to your server, we recommend you ensure you have a backup of the files before you begin, and confirm you have access to the Server using any of the Out of Bands methods available (Memshell or your DRAC).
Network Configuration
Linux Network Configuration (Redhat/CentOS)
There are two files to edit for Redhat based distributions:
First edit the below file with your chosen text editor (e.g. Vi/Vim or Nano):
/etc/sysconfig/networkIn here you need to append the following:
NETWORKING_IPV6=yesNext you need to edit:
/etc/sysconfig/network-scripts/ifcfg-eth0To this file you need to append the following:
IPV6INIT=yes
IPV6ADDR=<IPv6-IP-Address
IPV6_DEFAULTGW="fe80::1%eth0"If you have more than one IPv6 address to add you can add additional addresses by appending the following line:
IPV6ADDR_SECONDARIES="<Secondary-IPv6-IP-Address> <Tertiary-IPv6-IP-Address>"Once these changes have been made, restart networking with:
service network restartNow test by pinging an IPv6 enabled website:
ping6 ipv6.google.comLinux Network Configuration (Debian/Ubuntu)
To add the IPv6 addresses to the network configuration of a Debian or Ubuntu server, you need to do edit the below file with your chosen text editor (e.g. Vi/Vim or Nano):
/etc/network/interfacesAppend the following after the current eth0 section (carefully applying any indentation where needed):
up ip addr add dev eth0 <IPv6-IP-Address>
up ip route add default via fe80::1 dev eth0If you have additional addresses to add then simply repeat the first line.
Once this is done, restart networking:
/etc/init.d/networking restartNow test by pinging an IPv6 enabled website:
ping6 ipv6.google.comWindows Network Configuration
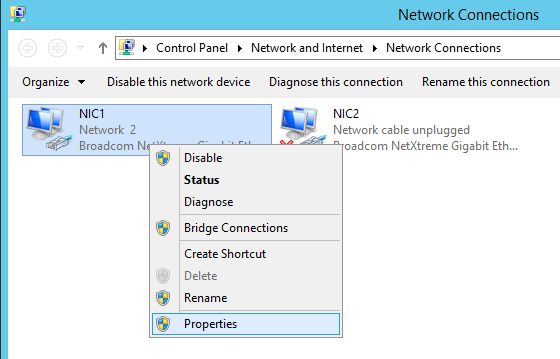
To configure an IPv6 Network interface in Windows you will need to access the Network Connections menu by entering the following into either the Command Line or start menu.
ncpa.cplFrom this menu, you can right click your Network Adaptor and select Properties.
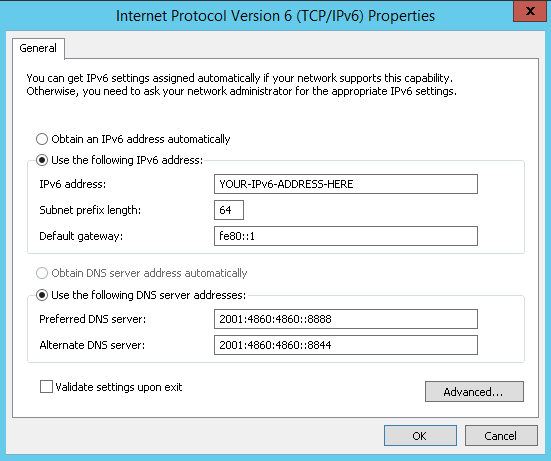
Then, select the 'Internet Protocol Version 6 (TCP/IPv6)' item and, ensuring the tick box is marked, select Properties within that panel as below. 
Your interface will be configured as per the example below, with the exception of the 'IPv6 Address:' field which is where you will enter the IPv6 address assigned to the Server.