Managing your Backup Policy for R1Soft Backups
Applies To: CLOUD VPS DEDICATED WINDOWS BACKUPS
When the R1Soft Backup agent is installed on a server with Managed Backups enabled, at the same time an account is created on the backup server (if one does not already exist). When this account is created a default backup policy is also applied to backup your server. The default policy will be given the Memset name of your server and the text "Daily Backup" e.g. "examplaaa Daily Backup". This default policy has the following properties:
- All Partitions and File Systems (available at the time it was created) will be Included in the Backup.
- Backup Schedule is set to "Daily" and scheduled to run during the night (the exact time is different for every server but is shown in policy).
- The Number of Recovery Points to retain is set to "7 Recovery points". This means that historical data from the preceding seven days is retained.
- The Backups will Includes any MS SQL Databases (available at the time it was created).
- The Backups will exclude any Exchange Server Instances not manually Included.
Modifying the Default Policy or Creating a New Policy
The dialogue box for creating a new policy or modifying an existing one are exactly the same so the following guide can be used for either option.
The default backup policy is generally sufficient for most requirements and can be left unmodified. However, we do recommend that you review your Backup Policy to ensure it meets your needs, should it be necessary to modify it, then the following guide will show you how to do this.
The Policies page in Server Backup Manager allows you to view, add, and edit policies. You can access all of the functions you need to manage your policies by selecting "Settings" and then "Policies" in the Main menu.

Creating a New Policy
To create a New Policy select, the "New Policy" button at the top of the page, above the table.
Editing an Existing Policy
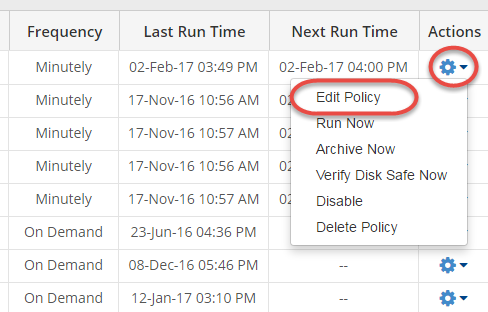
Find the policy you want to edit in the list of Policies, click the corresponding Actions icon, and select Edit Policy.
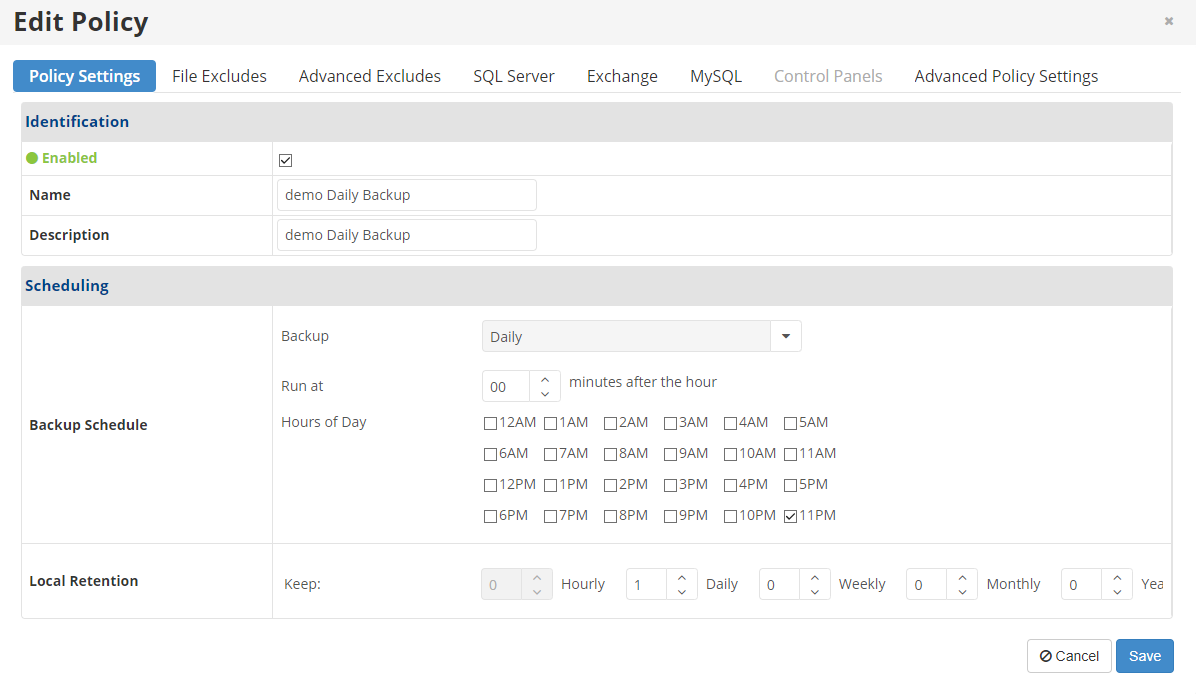
This will open a new dialog box where all the configurable parameters for the policy can be edited. The following image shows the first page; "Policy Settings" and all the other sections of the policy are the tabs along the top of the window, which can be selected at anytime.
Each section of the Policy is explained below;
Once you have finished making your changes, if you are editing an existing policy, select the "Save" button, or if you are creating a new Policy, select the "Create" button.
Verify Backup Changes
After making any changes to the Backup Policy, we always recommend that you review the Backups after the next successful backup has completed to ensure that the changes have worked as expected and that there have not been any inadvertent consequences.
Policy Settings
This page contains all the most general setting of the policy. The sections and points are as follows:
Identification
- Enabled - This option is where the policy is turned off and on. Disabling the policy will only suspend its operation and does not delete it.
- Name - The displayed name of the policy.
- Description - The displayed description of the policy.
Scheduling
- Backup Schedule - This is where the timetable for when the backups are taken is configured. The schedule options here are:
- On demand (this means that backups will only be taken when they are run manually by logging into the control panel and clicking on the Run Now button)
- Minutely
- Hourly
- Daily
- Monthly
- Weekly
- Yearly
- Local Retention - This is where you can set how many recovery points to keep based on recovery point age. Recovery points that match this setting are also called retention points. This should not be confused with the "Number of Recovery Points to Retain" option in the "Advanced Policy Settings" page.
File Excludes and Advanced Excludes
It is sometimes desirable to exclude certain files or directories from a backup in order to reduce wasted space on the backup server. These exclusions are set in next two sections, "File Excludes" and "Advanced Excludes" sections.
Database File Excludes
Please note that the database files can not be excluded if you wish to restore them. You would need to not exclude the files from the backup.File Excludes
The first section, "File Excludes", presents a browseable representation of the filesystem on the server to be backed up. Each directory and file has a check box to the left of it. When checked the file or directory (and all the contents of the a checked directory including it's sub-directories) will be excluded from the backup.
Advanced Excludes
The second section, "Advanced Excludes", allows a pattern matched exclusion rule to be set. This means that either a file name or a part of a file name and/or extension can be used with a * indicating that that part will match anything.
The following image shows two exclude rules:

The first will exclude all files that end in the extension ".mp3 "on the entire "C:\" drive because the path is set to be "C:\" and the Recursive option (i.e. Check in all sub-directories), box is checked.
The second rule will exclude any files that end in ".flac" from the "C:\Music" directory and will not check further down the file tree into any sub-directories.
Backing up Databases
R1Soft has two sections for backing up databases on your server. One for native MS SQL databases (this is located on the "SQL Server" Tab) and the other for MySQL databases (this is located on the "MySQL" Tab).
SQL Server
The SQL Server page, will allow you to backup any Microsoft SQL databases present on the server. The default configuration for the Memset Policy is to backup all MS SQL databases on the server.
If you wish to only backup selected databases uncheck the Backup All Databases box, and select the "Discover Instances" button and add in the databases that you want backed up.
Further Information
For further information on the SQL Server Backup Options, see this offical R1Soft Documentation article.MySQL
The MySQL page will allow you to backup MySQL (and also MariaDB) databases. This section requires some additional configuration in order to log into the MySQL server and take a consistent backup. After clicking on the MySQL tab you need to select the "Add new MySQL Instance" button:

The sections of the dialogue are explained below:
- Name
- This is where a friendly name for the database instance is applied. It need only be something that you can remember.
- Host
- By default the R1Soft server will use the server that the policy has been created for. If your server has has more than one IP and MySQL is listening on a different port you will need to enter that here.
- Port
- The port field is pre-filled with port number 3306 as this is the standard MySQL port. If your MySQL instance is listening on a non-standard port you will need to enter it here.
- Authentication
- Here you need to enter the username and password for a user that has sufficient privileges to access all the databases. This is usually the default root user.
- Data Directory
- The R1Soft server will discover the data directory for the MySQL instance. This is the directory that contains the databases. Should this be non-standard or if R1Soft is incorrect it can be manually set here.
- Base Directory
- This is the directory that contains the MySQL installation. Again R1Soft will find this out automatically. It can also be set manually if your databases are in a non-standard location.
- Options
- These are some additional options backup options that can be enabled.
- Summary
- This page prints all the information that has just been entered along with a button to test the connection to the database.
If all the details of the database were entered correctly and the Backup Agent was able to connect, then you will a message stating "Successfully connected to database", otherwise this indicated the Settings is incorrect or there is a Firewall Rule preventing access.
Backing up Exchange Instances
On the "Exchange" page, here you can configure the Backup Settings for all the exchanges instances on the server is achieved by simply checking the "Backup All Exchange Instances" box.
When this is checked the R1Soft Agent on the server will automatically scan the server for Exchange Instances and present a list of the available instances for backup.
Control Panels
This section is where hosting control panels such as cPanel, or Plesk are enabled and configured. Memset's R1Soft instances do not support this feature.
Advanced Policy Settings
This final tab contains a few additional configuration options. Generally, they can be safely left as the defaults.
The Advanced Policy Settings section of this tab displays the advanced settings of the selected Policy.
Recovery Point Retention
The Recovery Point Retention section of this tab displays the following information:
- Recovery Point Limit - Displays the maximum number of stored Recovery Points. When the number is exceeded, the Recovery Points will be merged. See Merge recovery points.
- Merge Schedule - Displays the Merge Schedule of the Policy. See Schedule recovery point merges.
- Disk Safe Verification Schedule - Displays the Disk Safe Verification Schedule. See Schedule Disk Safe verification.
The number of recovery points represents the number of backups that are retained in the current pool. Once the number of recovery points taken equals number of recovery points to retain then the oldest will get merged to make way for the newest on each subsequent backup.
Furthermore, should you wish to stop a particular recovery point being deleted it is possible to lock recovery points such that they will never get deleted. Please see the section on Managing Recovery Points for detailed information on configuring recovery points, archived recovery points and locking recovery points.