Using SSH from Windows
Windows does not come with any SSH Client Pre-Installed, as such a SSH client needs to be installed to use it. PuTTY is an excellent and actively developed open source SSH client that can be used for Windows and is one of the most popular clients available.
OpenSSH on Windows
It is also worth mentioning that in newer releases of Windows (Windows 10 and Windows Server 2019), that OpenSSH can now be installed and configured as a SSH Client, more information on this can be found here.
Alternatively for more experienced users, Windows 10 also comes with the Windows SubSystem for Linux (WSL) that allows you to run a Linux environment on your local device, this will come with OpenSSH functionality out of the box.
PuTTY’s home page is located here. The latest 32bit version (which will work on 64bit and 32bit processors) is always available from this this link.
The file that is linked to is a standalone binary so does not require installing and will simply run when double clicked. For a more longer term solution, we recommend you download the Installer and install PuTTY on your local device.
Logging into a Linux Server with PuTTY
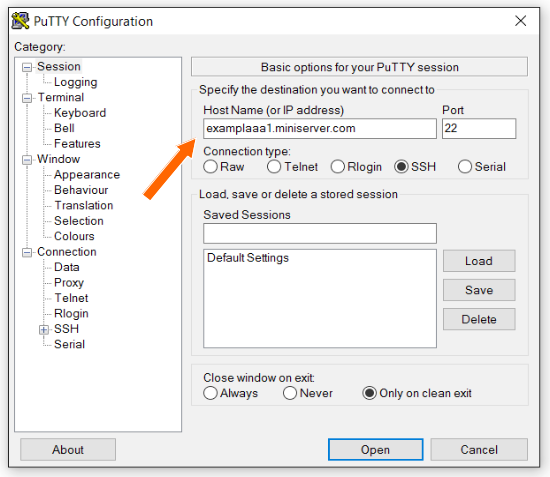
When PuTTY is opened it will display the basic options page. A Linux server can be logged into from this page by entering the hostname or IP address of a server in the “Host Name” field. Shown here:
When you have entered this select the “Open” button at the bottom. The first time that you connect to a new server (or after a server is re-imaged or re-installed) the following warning will appear:
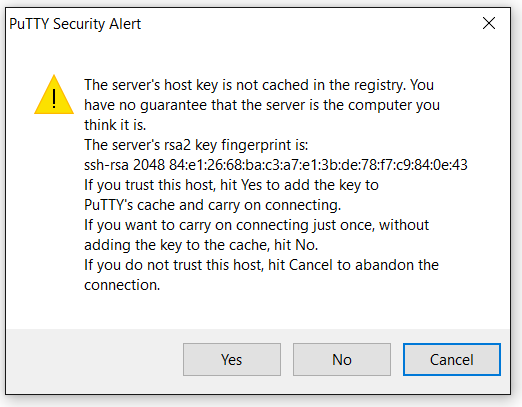
You can select the “Yes” button to continue connecting.
A command line terminal will then open with a prompt to enter a username to login as;
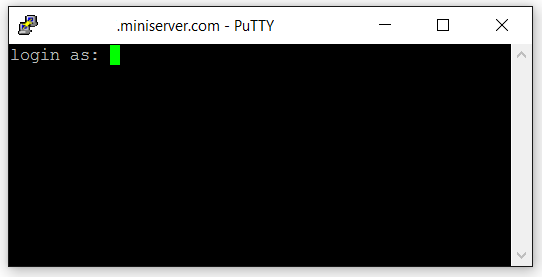
Enter the user that you want to log in as and press the "Enter" key on your Keyboard. You will then be prompted for the password for that user, and once entered, you will then be logged into the server’s command line interface.
Streamlining PuTTY
The simple connection described above requires manually entering the hostname or IP address and authentication details for every connection. PuTTY provides a mechanism to save a connection and all its settings for quick access. PuTTY calls these saved connections “Sessions”.
The process for creating a saved session is as follows:
- Open PuTTY and enter the hostname of the server you want to connect to.
- Enter a name for the session into the "Saved Sessions" field.
- Click "Save".
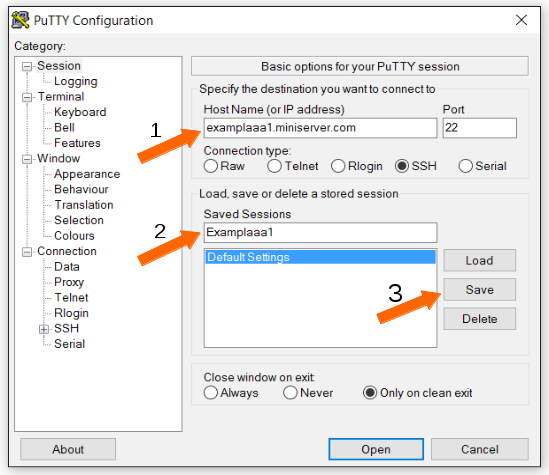
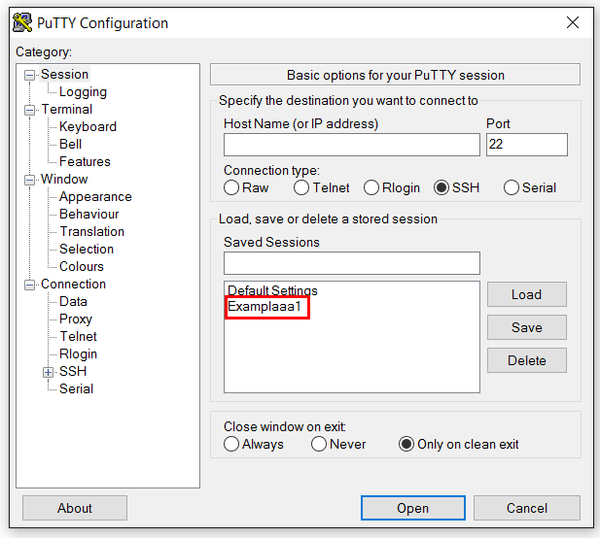
A saved session will then be displayed under “Default Settings” when PuTTY is opened:
In order to use a saved session:
- Click on the saved session name e.g. "Examplaa1".
- Click "Load"
- Click "Open"
or, simply double-click on the saved session name.
A session can be updated to include new configuration once it has been created. In order to do this:
- Highlight the sessions name.
- Click “Load”.
- Set new configuration.
- Click “Save”.
The session will now include any new settings such as those described below.
Automatically Set Login Username
PuTTY can be configured to automatically enter a username when logging into a server. This is done as follows:
- Load the session.
- Click on “Data” under the “Connection” section.
- Enter the desired username in the “Auto-login username” field.
- Save the session.
All future sessions will then automatically login as that user.
SSH Keys
A secure protocol, in addition to encryption, demands that authentication. The two principle ways of doing this with SSH are:
- Passwords
- Cryptographic Keys
Password authentication is the default method for logging in via SSH and will be enabled by default on all Memset servers. Password authentication is secure but there are several advantages to disabling password authentication and instead relying on SSH keys. SSH keys are more secure than passwords as they are all but impossible to brute force attack on the server end. An attacker must have access to the private key to log into the server. They are also more efficient because any server that has the public key can be logged into from any computer that has the private key. This means that a single key (and password) can be used to securely log into any number of servers.
Every SSH key pair is unique. Therefore, in order to start using an SSH key pair they must first be generated.
Generating a Key Pair
PuTTY cannot generate a key pair, however, PuTTY’s author has also written a tool to generate a key pair suitable to use in PuTTY. This tool is called PuTTYGen. The latest version is always available via this link.
When PuTTYGen is opened it will default to the following parameters for an SSH key pair:
- RSA
- 2048 bits
RSA refers to the encryption algorithm and 2048 bits is the length of the key. A longer key is more secure but incurs a performance penalty. However, with modern computers, a key length of 4096 bits will not cause any noticeable performance issues and will be secure for a much longer time as attackers computers get more powerful.
Therefore, a bit length of 4096 should be entered into the “Number of bits in the generated key” field.
Create the new key by selecting the “Generate” button. When the keys have been generated you will see the following screen:
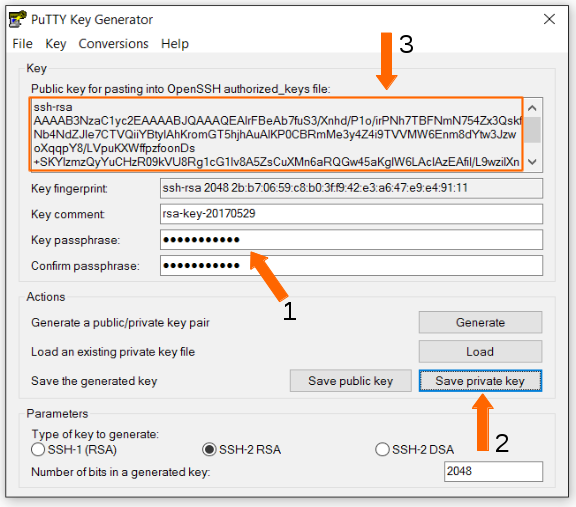
In order to save the key pair:
- Enter a secure password here.
- Click “Save private key” to save the private key to a file.
- Copy and paste the public key displayed in the square into a text file (make sure you get all of it by scrolling down). This will be needed later to copy to the server.
Saving your SSH Keys
Now is also a good time to save both files (or their contents) into a password manager for secure portability.Using SSH Keys
SSH keys can only be used once the public key has been copied to the server. It must be added to the ~/.ssh/authorized_keys file of the user you intend to log in as.
In order to do this log into your server via SSH using a username and password. Then open the authorized_keys file with your favourite text editor, nano is shown here:
cd ~/.ssh
nano authorized_keysThen paste the entire public key shown above in the PuTTYGen save screen. The public key must only occupy a single line. Then exit the server.
Next, open PuTTY and load the session for that server. Then expand the SSH category and highlight the “Auth” section. Select the “Browse” button and find the private key you saved from PuTTYGen.

Before selecting “Open” go back to the “Session” page and click “Save”. The key will always now be used for this session.
Finally, select “Open”. You will be prompted for the password of the private key and not the password for the server.
This method of using the SSH keys means that the key’s password must be entered every time a connection is opened. However, it will always be the same password i.e. the key’s password, no matter which server is being logged into. This is convenient in that only a single password needs to be remembered.
However, this process can be further streamlined by loading the key into memory so that a password is only required a single time and not for every connection.
Loading a SSH Key into Memory
When an SSH key is loaded into memory it will be available for use whenever a new connection is made to a server. PuTTY will automatically check for the presence of a loaded key when it initiates a new connection and will use it automatically, without prompting for a password, if one is present.
PuTTY cannot load the key into memory but a program by the same developer does. This program is called Pageant. The latest binary is available from this link.
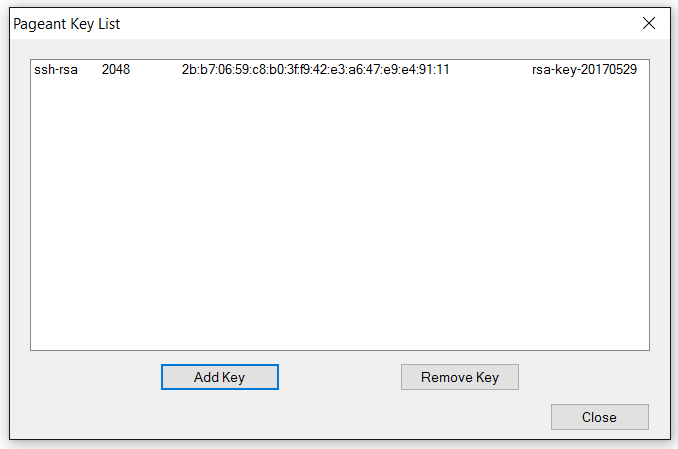
Pageant is a simple program that only loads private SSH keys. All that is required to do so is to select the "Add key" button, locate the private key and open it.
Once the private key that was created with PuTTYGen is opened and loaded with Pageant it looks like the following:
PuTTY will attempt to use all the private keys loaded into memory with Pageant when making a connection to a server. If the private key is loaded with Pageant and the username already configured in PuTTY a connection will be made without requiring any user input.