Creating an OpenStack Instance
Applies To: CLOUD IAAS
The first thing you are likely to want to do when you first log into your Cloud IaaS (powered by OpenStack) dashboard is to create a new Instance and log into it. This is a simple procedure but does require a little familiarity with the layout and tools available in the dashboard as well as an understanding of the Cloud IaaS (powered by OpenStack) Fundamentals.
Instances are created from the Instances tab which can be found at Project -> Compute -> Instances
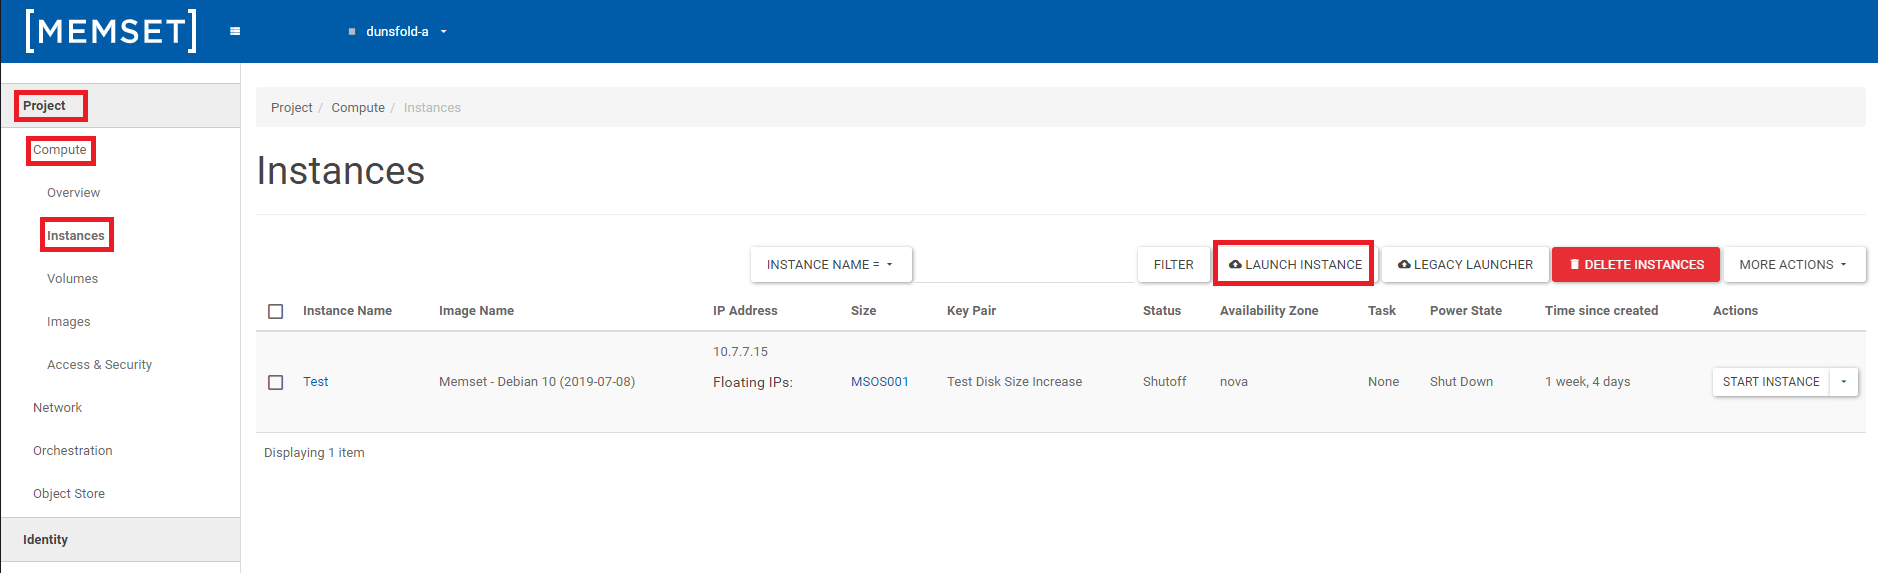
Once there click on the "Launch Instance" button to open the instance creation dialogue.
Details
The first page of the instance creation dialogue is the Details tab and will look similar to the below;
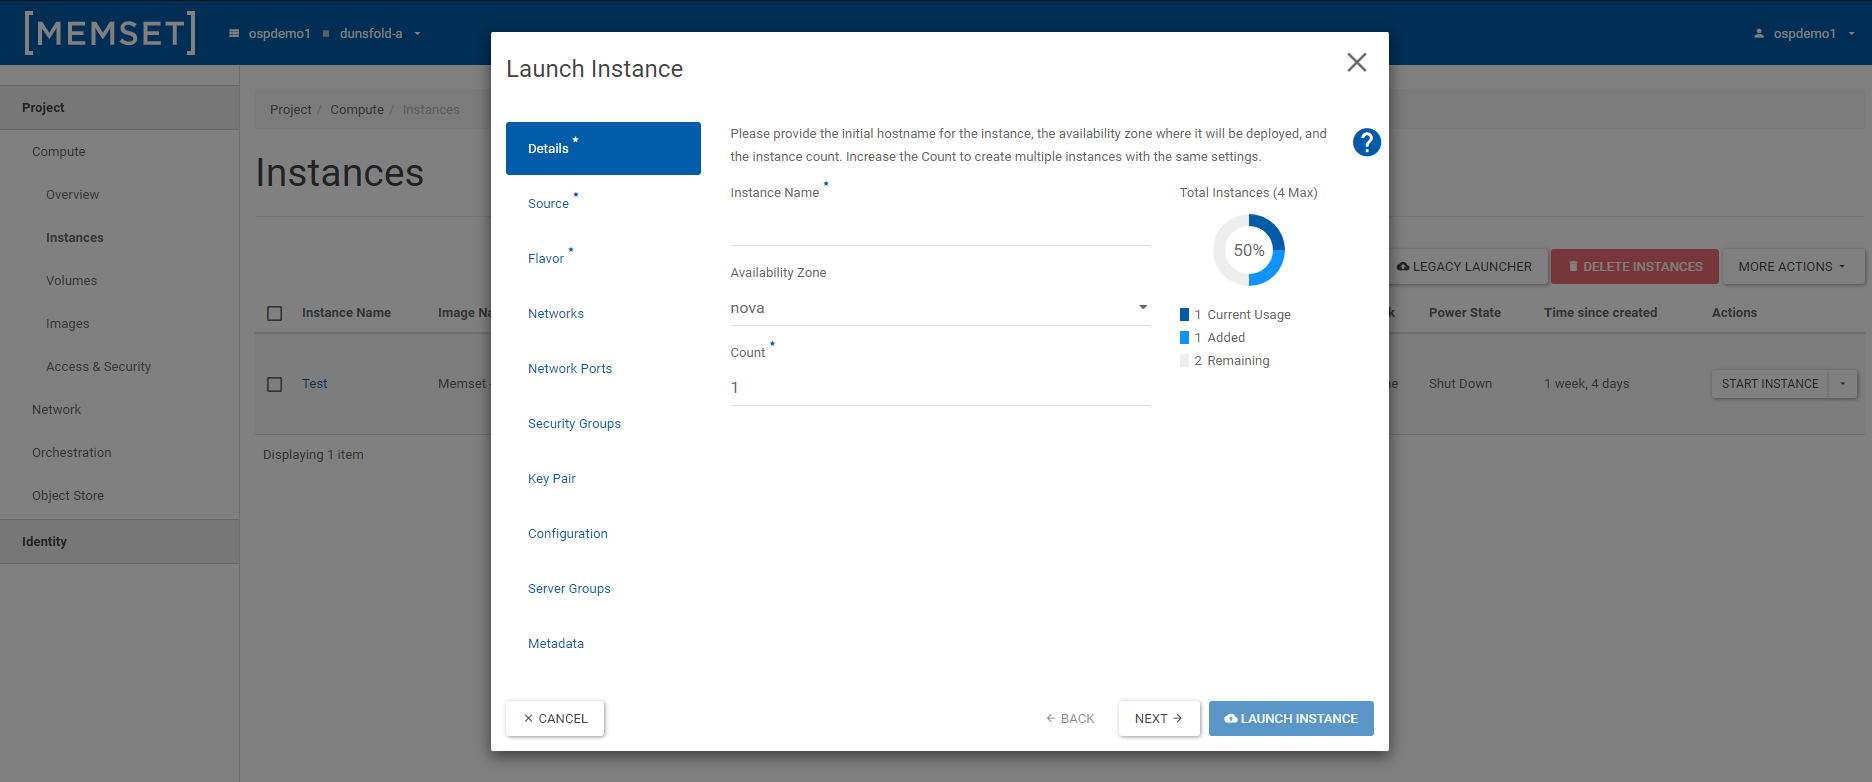
Here you will need to provide the initial hostname for the instance, the availability zone where it will be deployed, and the instance count. Increase the Count to create multiple instances with the same settings.
The configuration options available here are as follows;
Availability Zone
This is a way to segregate hosts depending on preset criteria. However, this option is not available in the Memset dashboard so it should be left as the default, which is; nova.
Instance Name
A configurable name for the new virtual machine.
Instance Count
The number of virtual servers that will be started.
Once you have entered the details select the "Source" option on the left side ore press the "Next" button to continue.
Source
The Source page allows you to configure the Instance Source, this is the template used to create an instance. You can use a snapshot of an existing instance, an image, or a volume (if enabled). You can also choose to use persistent storage by creating a new volume.
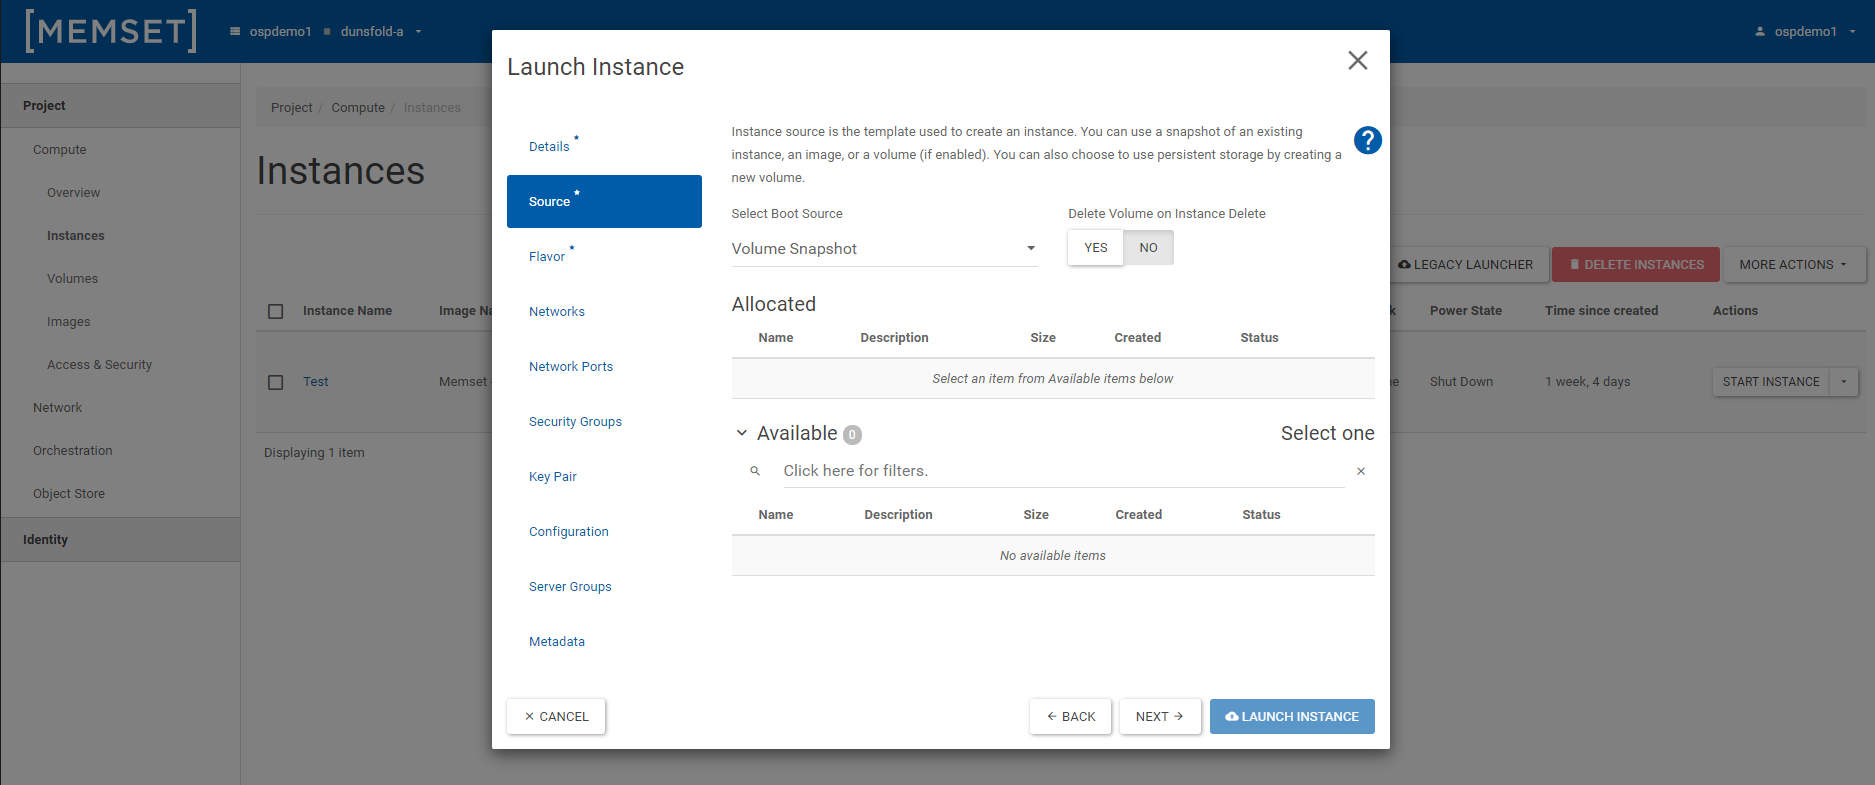
If you want to create an instance that uses ephemeral storage, meaning the instance data is lost when the instance is deleted, then choose one of the following boot sources:
- Image: This option uses an image to boot the instance.
- Instance Snapshot: This option uses an instance snapshot to boot the instance.
If you want to create an instance that uses persistent storage, meaning the instance data is saved when the instance is deleted, then select one of the following boot options:
- Image (with Create New Volume checked): This options uses an image to boot the instance, and creates a new volume to persist instance data. You can specify volume size and whether to delete the volume on deletion of the instance.
- Volume: This option uses a volume that already exists. It does not create a new volume. You can choose to delete the volume on deletion of the instance. Note: when selecting Volume, you can only launch one instance.
- Volume Snapshot: This option uses a volume snapshot to boot the instance, and creates a new volume to persist instance data. You can choose to delete the volume on deletion of the instance.
Once you have entered the details select the "Flavor" option on the left side ore press the "Next" button to continue.
Flavor
The flavor you select for an instance determines the amount of compute, storage and memory resources that will be carved out for the instance.
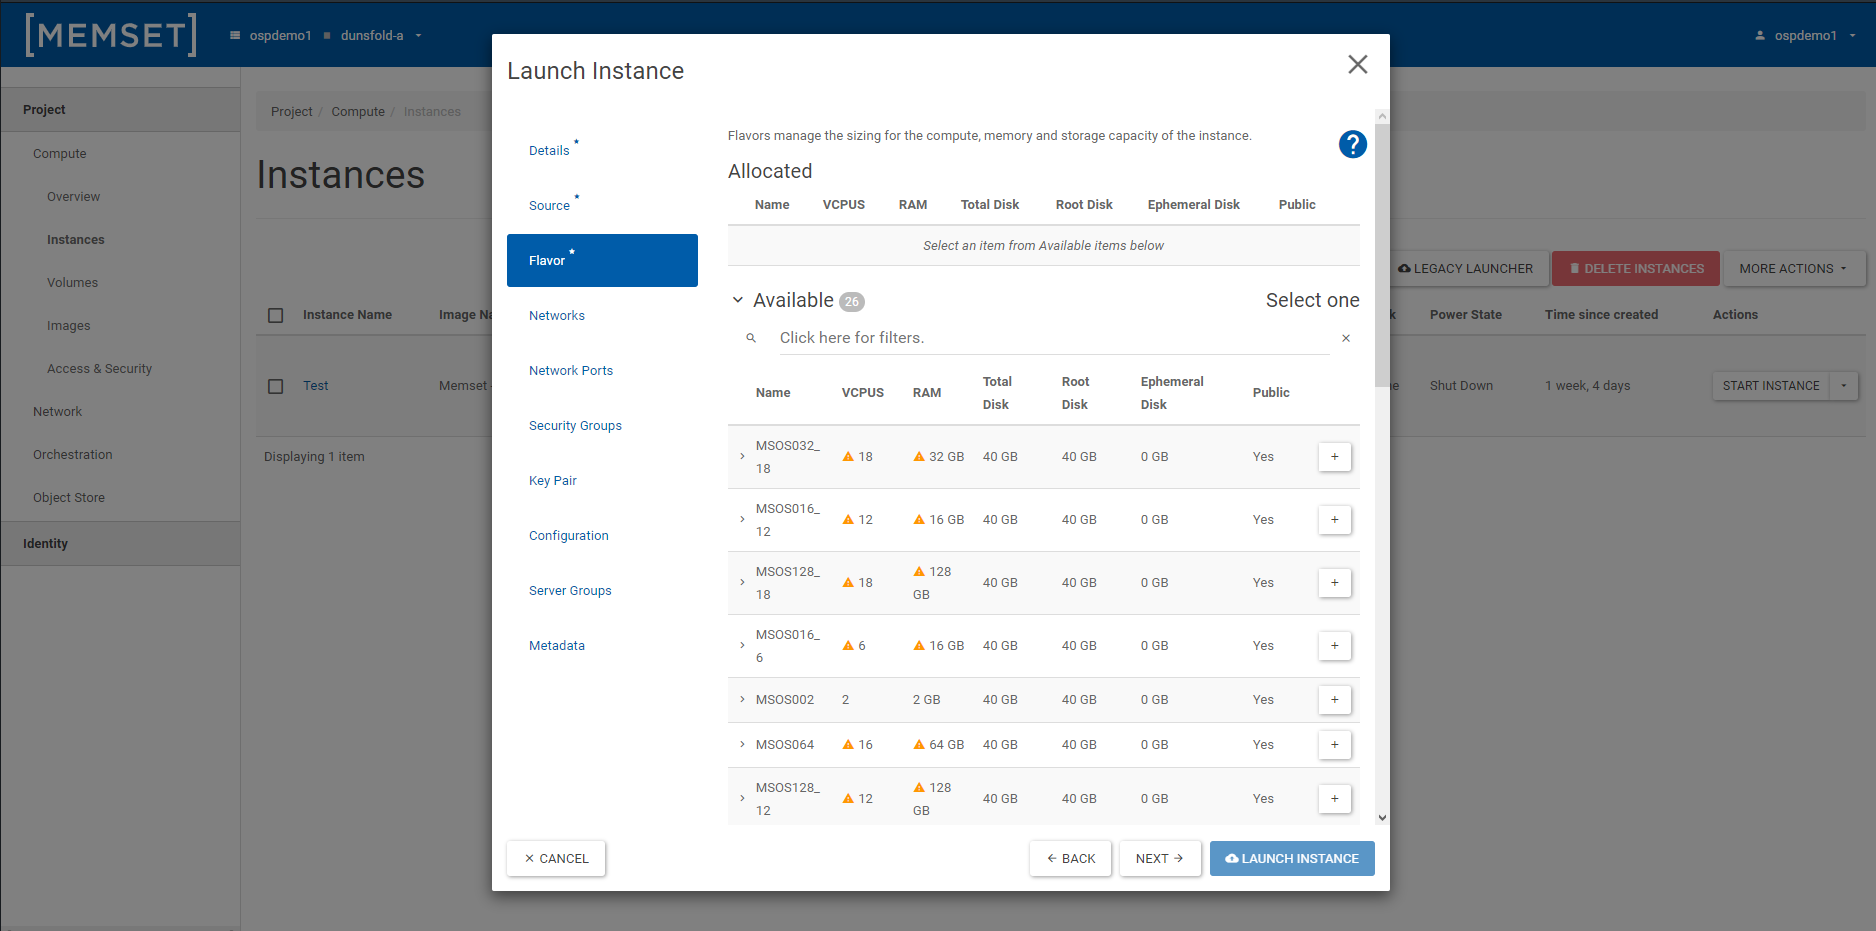
The flavor you select must have enough resources allocated to support the type of instance you are trying to create. Flavors that do not provide enough resources for your instance are identified on the Available table with a yellow warning icon.
Memset is responsible for creating and managing flavors. A custom flavor may be able to be created for you or for a specific project where it is shared with the users assigned to that project. If you need a custom flavor, contact our Technical Support Team to discuss you requirements.
At this point generally the Instance should be available to be launched, however there are still quite a few other configurable options that we recommend you at least review first.
Once you have entered the details, if you are ready to Launch your Instance then select the "Launch Instance" button, otherwise select the "Networks" option on the left side ore press the "Next" button to continue.
Networks
The Networks page allows you to configure the Networks to provide the communication channels for the Instance.
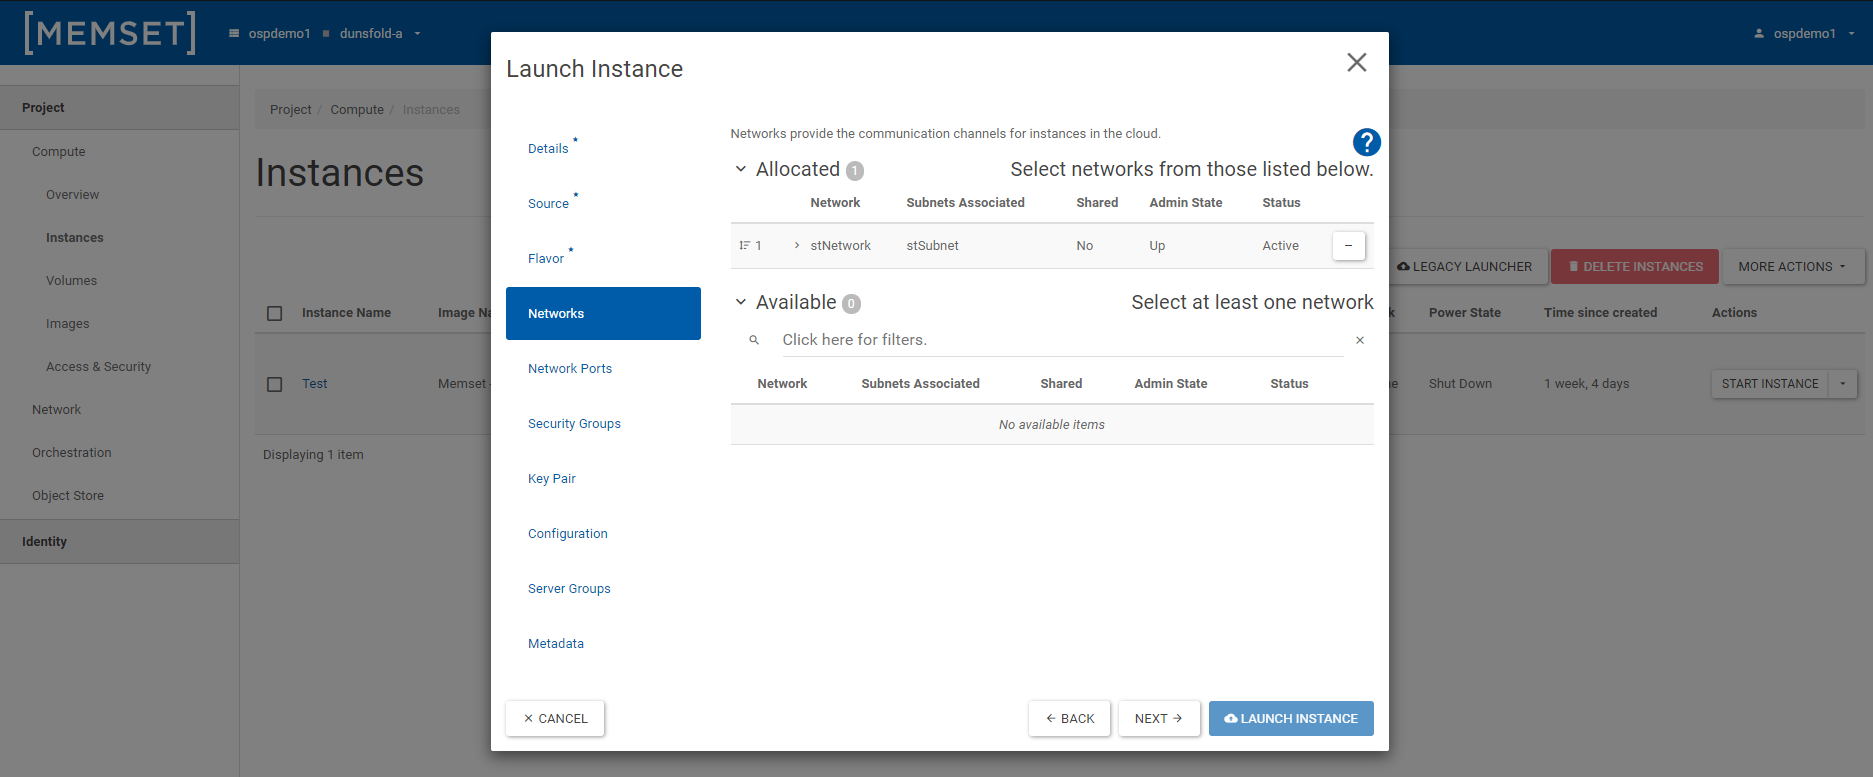
Project networks are created by users. These networks are fully isolated and are project-specific.
If you want an instance to communicate outside of the data center, then attach a router between your Project network and the External network. You can use the Network Topology view to connect the router to the two networks.
A floating IP allows instances to be addressable from an external network. Floating IPs are not allocated to instances at creation time and may be assigned after the instance is created. To attach a floating IP, go to the Instances view and click the Actions menu to the right of an instance. Then, select the Associate Floating IP option and enter the necessary details.
Network Characteristics
The subnet identifies a sub-section of a network. A subnet is specified in CIDR format. A typical CIDR format looks like 192.xxx.x.x/24.
If a network is shared, then all users in the project can access the network.
When the Admin State for a network is set to Up, then the network is available for use. You can set the Admin State to Down if you are not ready for other users to access the network.
The status indicates whether the network has an active connection.
Once you have entered the details, if you are ready to Launch your Instance then select the "Launch Instance" button, otherwise select the "Network Port" or "Security Groups" option on the left side ore press the "Next" button to continue.
Ports
This page allows you to configure the Network Ports in use, Network Ports provide extra communication channels to your instances. You can select ports instead of networks or a mix of both.
Once you have entered the details, if you are ready to Launch your Instance then select the "Launch Instance" button, otherwise select the "Security Groups" option on the left side ore press the "Next" button to continue.
Security Groups
This page allows you to select the security groups to launch the instance in.
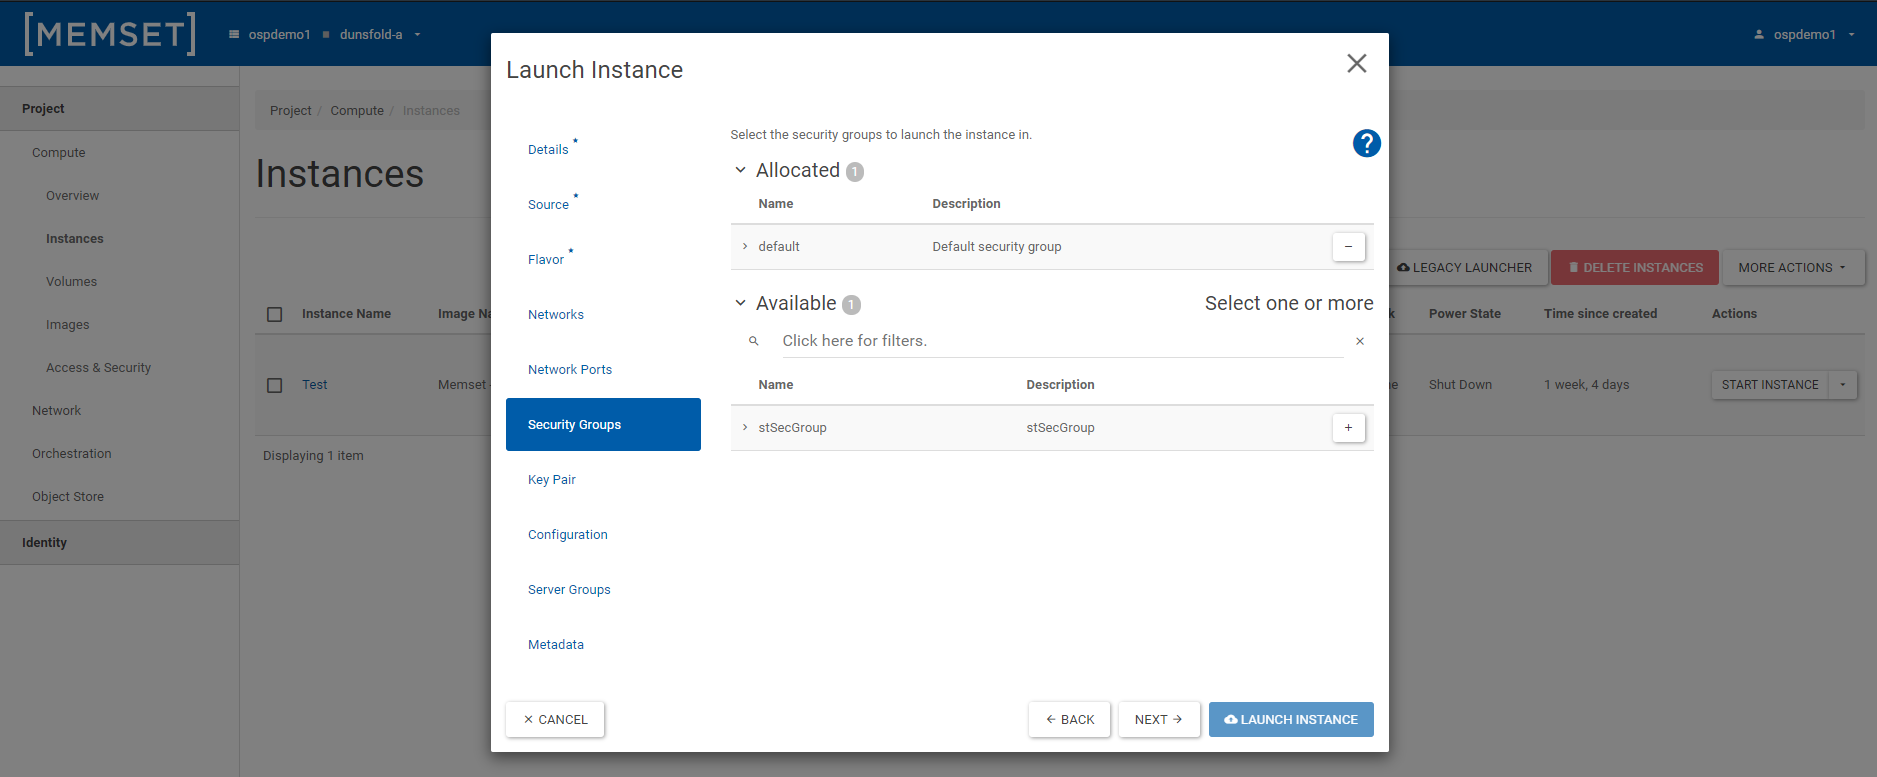
Security groups define a set of IP rules that determine how network traffic flows to and from an instance. Users can add additional rules to an existing security group to further define the access options for an instance. To create additional rules, go to the Compute | Access & Security view, then find the security group and click Manage Rules.
Security groups are project-specific and cannot be shared across projects.
If a security group is not associated with an instance before it is launched, then you will have very limited access to the instance after it is deployed. You will only be able to access the instance from a VNC console.
Once you have entered the details, if you are ready to Launch your Instance then select the "Launch Instance" button, otherwise select the "Key Pair" option on the left side ore press the "Next" button to continue.
Key Pair
This page allows you to configure the SSH Key pair that will be pre-loaded onto the Instance and allows you to SSH into your newly created instance straight away. You may select an existing key pair, import a key pair, or generate a new key pair.

Once you have entered the details, if you are ready to Launch your Instance then select the "Launch Instance" button, otherwise select the "Configuration" option on the left side ore press the "Next" button to continue.
Configuration
This page allows you to customize your instance after it has launched using the options available, the "Customization Script" is analogous to "User Data" in other systems.
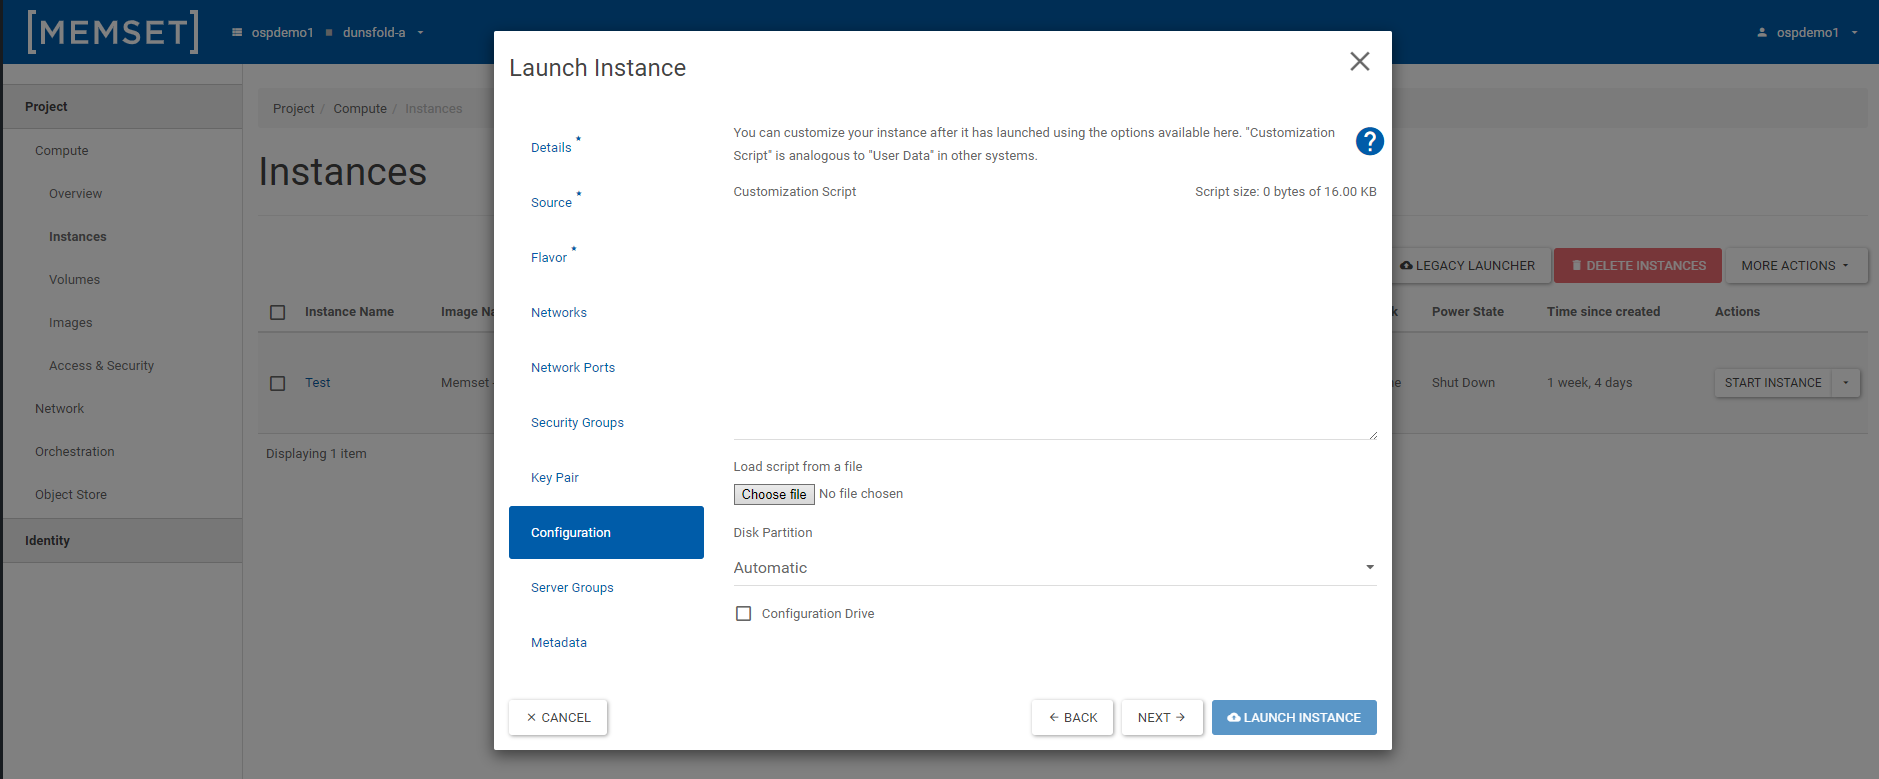
Custom scripts are attached to instances to perform specific actions when the instance is launched. For example, if you are unable to install cloud-init inside a guest operating system, you can use a custom script to get a public key and add it to the user account.
Type your script directly into the Customization Script field. If your browser supports the HTML5 File API, you may choose to load your script from a file. The size of your script should not exceed 16 Kb.
Disk Partitioning
An advanced option available when launching an instance is disk partitioning. There are two disk partition options. Selecting Automatic resizes the disk and sets it to a single partition. Selecting Manual allows you to create multiple partitions on the disk.
Check the Configuration Drive box if you want to write metadata to a special configuration drive. When the instance boots, it attaches to the Configuration Drive and accesses the metadata.
Once you have entered the details, if you are ready to Launch your Instance then select the "Launch Instance" button, otherwise select the "Server Groups" option on the left side ore press the "Next" button to continue.
Server Groups
This page allows you to select the server group to launch the instance in.
Server groups define collections of Instances (VM's) so that the entire collection can be given specific properties. For example, the policy of a server group may specify that Instances (VM's) in this group should not be placed on the same physical hardware due to availability requirements.
Server groups are project-specific and cannot be shared across projects.
Once you have entered the details, if you are ready to Launch your Instance then select the "Launch Instance" button, otherwise select the "Metadata" option on the left side ore press the "Next" button to continue.
Metadata
This page allows you to add Metadata items to your instance.
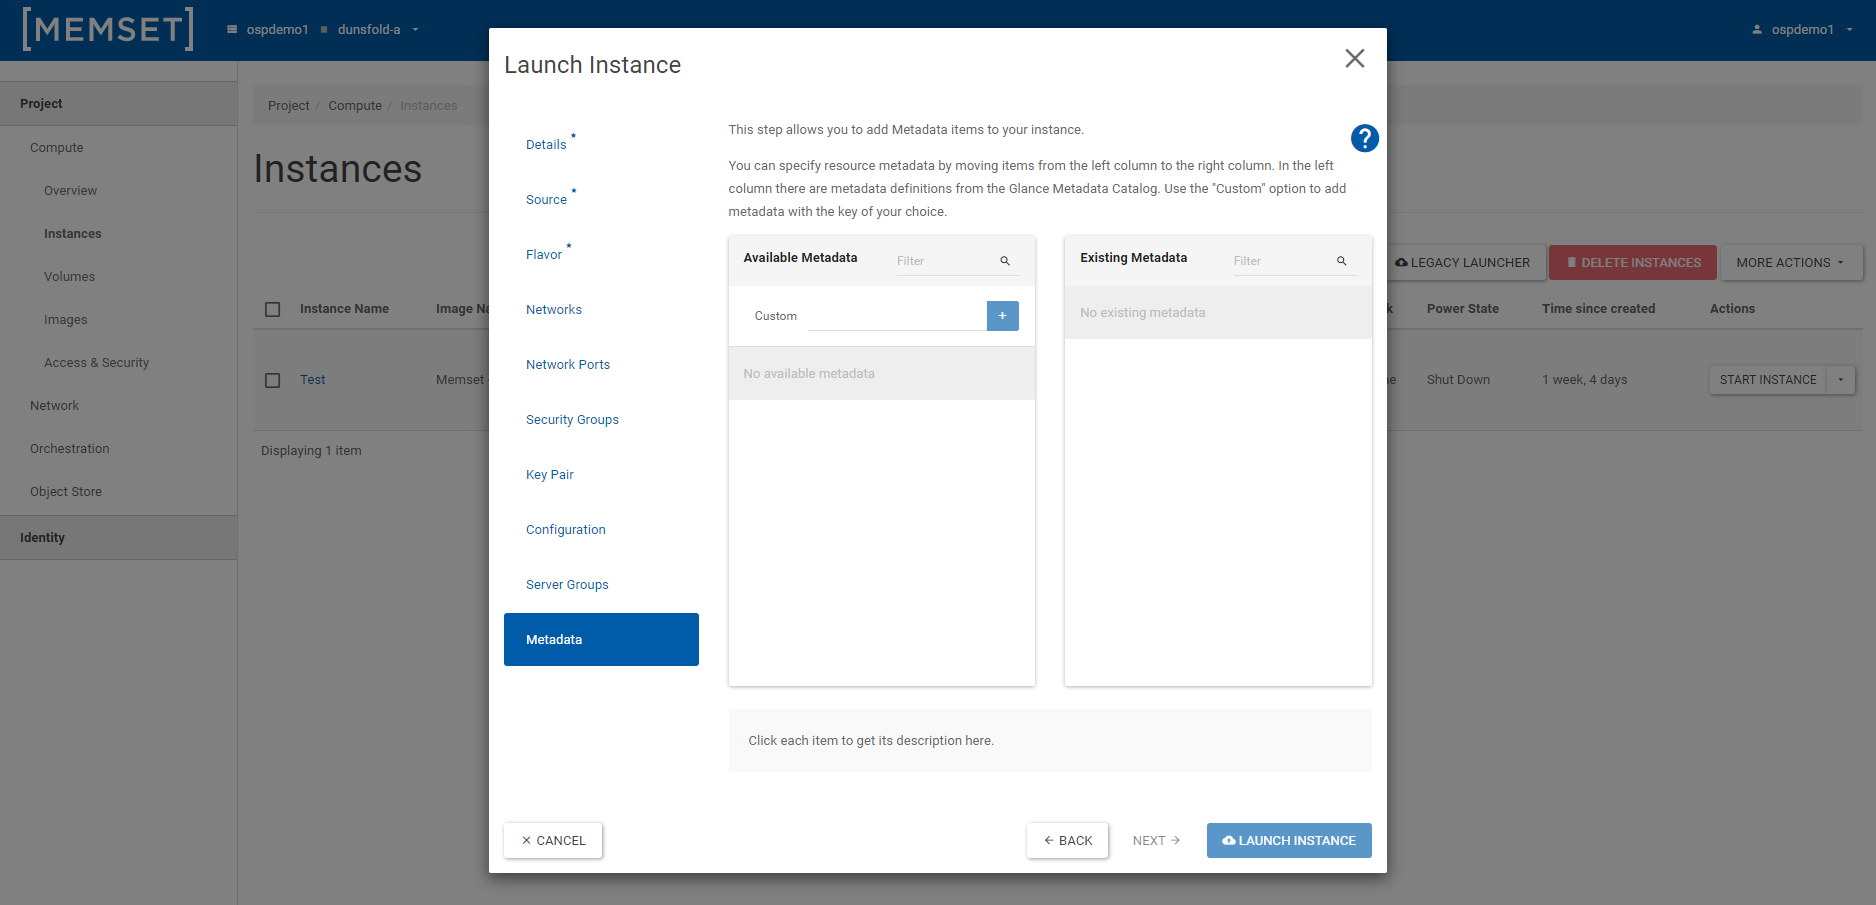
You can specify resource metadata by moving items from the left column to the right column. In the left column there are metadata definitions from the Glance Metadata Catalog. Use the "Custom" option to add metadata with the key of your choice.
You can add arbitrary metadata to your instance so that you can more easily identify it among other running instances. Metadata is a collection of key-value pairs associated with an instance. The maximum length for each metadata key and value is 255 characters.
The maximum number of key-value pairs that can be supplied per instance is determined by the compute provider. This limit is currently set to 128.
Once you have entered the details, select the "Launch Instance" button to launch your brand new instance using the Configuration provided.